Deployment and Operation
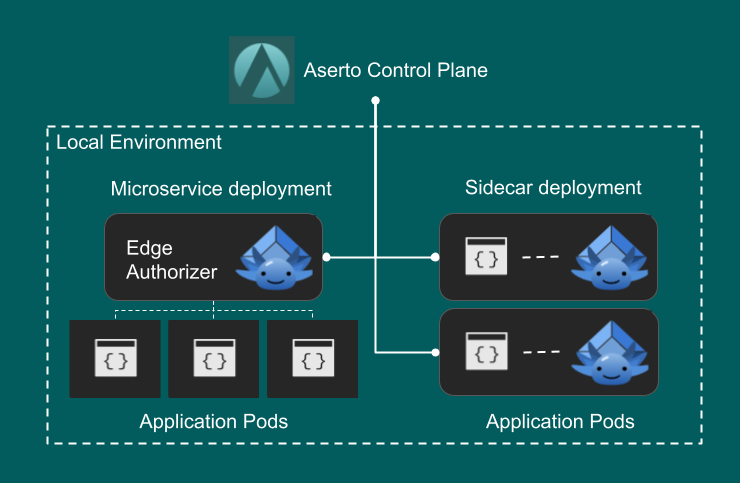
Edge Authorizers can be deployed in various ways based on the application and target environment needs and requirements. In its most basic form, an authorizer is a Docker container instance, which can be deployed as a standalone microservice or a sidecar.
An Edge Authorizer always operates in the context of a (single) Aserto organization and is assigned a specific policy instance to serve. This information is provided to the Edge Authorizer via a configuration file, which it uses to send a discovery call to the Aserto Control Plane.
Docker image
The Edge Authorizer ships as a docker image and can be pulled with following command:
docker pull ghcr.io/aserto-dev/topaz:latest
Only Topaz images with a version of 0.25.6 or higher support being deployed as an Edge Authorizer.
Deploying as a microservice
As shown in the diagram, you can deploy the Edge Authorizer as a standalone microservice. In this configuration the Authorizer runs in it is own dedicated container.
Running the Edge Authorizer using the Aserto CLI
For most scenarios it is sufficient to start the Edge Authorizer by using the aserto CLI. First, you need to configure your instance to connect to the Aserto Control Plane. Then you can start it.
To list the available Edge Authorizer connections, use the following command:
aserto control-plane list connections
Running the Edge Authorizer using the Docker CLI
For more advaced scenarios you may want to launch the Authorizer using the docker CLI.
The following docker command can be used to run the container. Make sure to update the POLICY_INSTANCE_NAME with your Policy Instance.
docker run \
-ti \
--rm \
--name edge \
--platform=linux/amd64 \
-p 8282:8282 \
-p 8383:8383 \
-p 8484:8484 \
-p 9292:9292 \
-p 9393:9393 \
-p 9494:9494 \
-v $HOME/.config/aserto/sidecar/certs:/certs:rw \
-v $HOME/.config/aserto/sidecar/cfg:/cfg:ro \
-v $HOME/.config/aserto/sidecar/eds:/db:rw \
ghcr.io/aserto-dev/topaz:latest run \
--config-file /cfg/<POLICY_INSTANCE_NAME>.yaml
Deploy as a Sidecar
Deploying an Edge Authorizer as a sidecar next to your applications is the most efficient way to deploy as it minimizes the authorization latency.
In this section we can follow an example deployment on minikube based on a golang backend application and the Edge Authorizer as a sidecar.
Prepare minikube
Start by preparing minikube, you can follow the installation instructions here.
Check if your minikube cluster is running:
minikube status

minikube
type: Control Plane
host: Running
kubelet: Running
apiserver: Running
kubeconfig: Configured
Preparing your backend application container
- Clone todo-go-v2 repository
- Add the following docker file to the root of your repository
Dockerfile:
FROM golang:1.19-alpine AS build-dev
RUN apk add --no-cache bash gcc build-base
WORKDIR /src

ENV GOBIN=/bin
ENV ROOT_DIR=/src

COPY . .
RUN go build

FROM alpine

LABEL org.opencontainers.image.title="todo-go-v2"
LABEL org.opencontainers.image.version="latest"

RUN apk add --no-cache bash
WORKDIR /app
COPY --from=build-dev /src/todo-go /app/

EXPOSE 3001

ENTRYPOINT ["./todo-go"]
-
Use
docker build . -t todo-go-v2:latestto build your backend application container -
Load the Docker image into the minikube environment using:
minikube image load todo-go-v2:latest
Prepare your deployment
Your deployment directory should contain the following [files](
Apply the deployment
To apply on your minikube cluster use: kubectl apply -f . --recursive
Once the deployment is finished you will have a pod that will contain 2 running containers that use the following images:
ghcr.io/aserto-dev/topaz:latest
todo-go-v2:latest
Get the running pod name:
TODO_POD_NAME=$(kubectl get pods -n default -l 'app=todo' -o jsonpath="{.items[0].metadata.name}")
Testing the backend application
If you want to test that the backend todo-go-v2 application is running from you local machine you can clone the todo-application but you will need to forwad the port from your minikube cluster to your local machine.
To forward the port of the todo-go-v2 backend deployment pod you will need to run:
kubectl --namespace default port-forward $TODO_POD_NAME 3001:3001
Navigate to the folder of the todo-application you have cloned and follow the instructions from the README.